Polymer Clay Fan

Free Sculpting Tutorials

Search Results

Dental Tools

Posted by goregt On March - 18 - 2007

Using Dental Tools for Sculpting

When I first started sculpting with Super Sculpey I went out and purchased a little $5 set of plastic sculpting tools at my local Hobby Lobby. These tools were great for the time and I used them consistently for about a year and half to two years. However, as my skills improved I started to realize the limitations of my starter set of sculpting tools.

Now I had heard through the grapevine that dental tools were great for sculpting. They come in a variety of sizes and shapes and best of all are made of metal. I first started by asking my local dentist if they had any old tools that they were disposing of. After a few crazy looks it was clear that I should just break down and go out and buy a set of my own. To my surprise I found a set of 18 dental tools on Amazon.com for a price around $25. I was skeptical at first but thought for that low amount of money it was worth taking the risk.

Read the rest of this entry »

Polymer Clay Tools

Posted by goregt On March - 15 - 2007
Polymer Clay tools that I use and recommend

Bookmark this page and check back frequently since the list of polymer clay tools will grow as I get a chance to write about the different tools that I use.

Sculpting Tentacles – Lesson One

Posted by goregt On August - 25 - 2009

I’m going to use wax for this tutorial but the same effects can be achieved with polymer clay.

Tools needed:

Read the rest of this entry »

Sculpting with Wax vs Polymer Clay

Posted by goregt On July - 31 - 2008

Stop the press, isn’t this site suppose to be about polymer clay sculpting, after all the name of the site is Polymer Clay Fan! Yes you have read the title to this post correctly, I’ve started playing with wax lately and although I’m still wet behind the ears I thought why not put together a little post to compare the two mediums. I’m sure a few diehard polymer clay artists may snub their nose at this post but I recommend reading through the entire article before jumping to a conclusion. This isn’t an article about discrediting wax or even polymer clay, it is just my observation of the positives and negatives the two different mediums have to offer.

Read the rest of this entry »

Polymer Clay Vase

Posted by goregt On May - 26 - 2007

Creating a Marbled Vase

This is a quick and easy tutorial that will demonstrate how to take a plain Jane glass vase and turn it into a work of art with the help of a little polymer clay. This is the first time I have ever done something like this myself so at the end of the page I will cover some lessons learned.

This really is a simple tutorial and I’m convince just about anyone can easily create a marbled vase. If it seems a little challenging at first then just keep practicing and it will come to you in no time at all.

The polymer clay I am using for this particular piece is Premo.

Glass vase filled with Premo polymer clay No need to cringe, you do not need that much clay for this tutorial. I was shopping at my local Hobby Lobby and went a little overboard on the clay. All is good since I will have plenty of clay for future projects. To give you an idea on how much clay you will need, I ended using less than one block of two or three colors by the time the vase was completed (My glass vase is around five (5) inches tall).Note: Make sure the glass vase that you purchase can be baked in an oven.
Polymer Clay Premo The first step is to condition the clay. Premo is a little firmer then the clay I normally use, Super Sculpey, so a pasta machine comes in handy here. I’m only using two colors on my vase so I keep rolling out the clay until it is fully conditioned.
Marbled clay The next step is the mix the two colors together and roll them both through the pasta machine. I repeated this step several times until I got a design I was happy with. Just roll the clay, fold, squish it together and roll it again. You don’t want to fully blend the clay, the key here is to keep the marbled look.
Applying polymer clay to the vase Simply press the clay onto the glass vase. I started from the bottom and worked my way up on this piece.
Polymer clay vase tutorial Still applying clay to the vase.
Smoothing out the clay Using one of my dental tools I blend the individual pieces together. Spend some time on this stage since you want the clay to look as if it was on piece. Try to avoid parting lines if possible.
Polymer clay vase art Once you create your own vase you will see how easy this tutorial really is. I personally like to try and take things to the next level when I create my art. A marbled vase is cool but a marbled vase with art hanging off of it is much cooler. I sculpted an Indian on my vase just to give it a little something extra.Tip: To cure the piece bake it in the oven at 275 degrees for 30 minutes (per 1/4 of an inch).
Profile of polymer clay vase A side view of my vase.Probably 98% of the colors on this vase are made up of clay. I added a little paint to tint the skin but other than that no paint was applied to this piece.

Lessons Learned

As I stated at the beginning of this tutorial, this was the first time I have tried something like this. The vase was a good learning experience for me and I did learn a few good lessons along the way. Here are a few tips I plan to use in the future:

1. Wear surgical gloves when sculpting a vase – No issues with the skin here, I just ended up with tons of fingerprints in my piece. Latex gloves would have been a quick and easy solution to avoid any fingerprints. Alcohol can remove the fingerprints but that is a lot of extra work.

2. Don’t rush the project – in all honesty this is not my favorite piece that I have created. I have a lot of other projects I should have been working on but just had to give this idea a try. I only gave myself a few hours for this piece and now looking at it I wish I would have set aside a little more time. All is not lost since I really did learn a lot by creating this vase.

3. Keep your area clean – key warning here, little clay particles lying around will somehow end up in your lighter clays. Also be sure to clean off the pasta machine before mixing different colors of clay.

That’s it! I’ll be sure to do more vases in the future and will probably show more of the sculpting stages in the process. The goal for this tutorial was to show you how you can mix glass and polymer clay to create a piece of art.

Until next time,

– Gerald

Sculpting Eyes

Posted by goregt On March - 25 - 2007

Sculpting the eyes

There are a variety of different ways to sculpt eyes and the technique that should be used really depends on the type of eyes you are looking to create. I’ll probably paint this piece with a bronze like finish so I want a more classic feel to my eyes. For these types of pieces I like to sculpt a hole where the pupil and iris are located. The hole creates a neat illusion and is a really nice way to sculpt the eyes. Now if you wanted to paint your eyes then you will probably not want to sculpt a hole for the pupil (and or iris).

For me personally the eyes and the hands are the hardest things to sculpt. The eyes tell so much of the story in your sculpture so if they are off it can really mess up the entire piece. These steps may seem pretty simple but they can be a real challenge. I probably sculpted the eyes on this piece 4 or 5 times until I got it close to what I am looking for. Don’t get discouraged if you also struggle with the eyes, just keep practicing until you get it right.

Read the rest of this entry »

Hand Tutorial

Posted by goregt On March - 18 - 2007

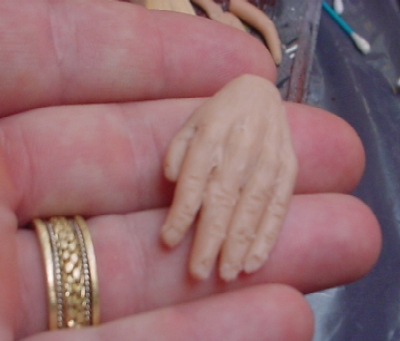
How To Sculpt Hand With Polymer Clay

Two of the hardest things that I have found to sculpt are the hands and eyes. I don’t know why, they are just shapes like anything else, but for some reason they always present themselves as a challenge for me. I have a little technique that I am about to share with you that I use for most of the hands I sculpt. However, keep in mind that this is not the only method you can use to sculpt hands.

The technique that I use does not require an armature which has its advantages and disadvantages. I’ve have used and armature in the past but the problem I found is when I decided later on in the sculpting to move the fingers. The fingers can still be moved when using an armature but the detail work can sometimes get damaged in the process. The disadvantage of sculpting hands without an armature is that you do not get the additional support that an armature provides. If the hand you are sculpting is just hanging by the side it really is not an issue, however if your character is holding something like a sword it can then be a problem.

Now the hand in this tutorial is going to be more of a sketch to give you the general idea on how to sculpt a hand. This tutorial should give you a good foundation to start building your hands off of.

Hand sculpting tutorial


*I need to upgrade my digital camera and apologize in advance for the quality of the pictures

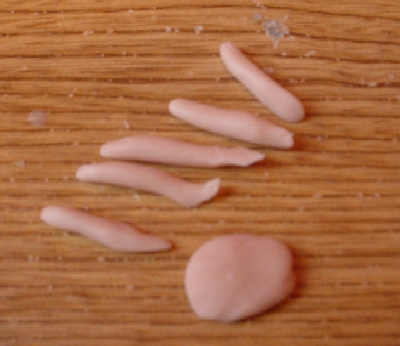
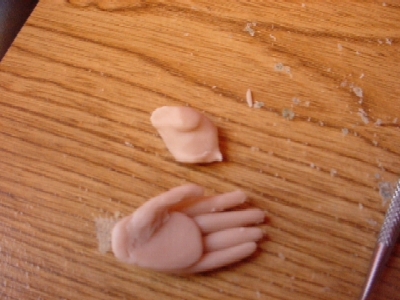
1. Roll out a ball of clay and slightly flatten it to the size that you want your palm.2. Roll out five little tubes of clay to represent the fingers
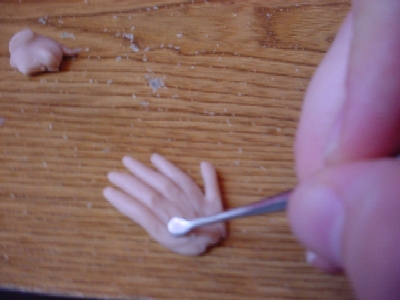
3. Strategically place the fingers onto the top of the squished ball of clay (look at your own hand as a reference)4. Using your sculpting tool, one of my dental tools in this example, pull the fingers into the base of the hand
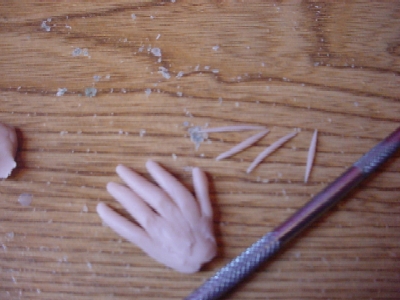
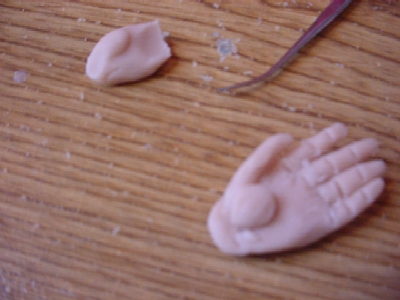
5. Roll out four more little tubes (snakes) to add as the bones in the hands
6. Roll out little balls of clay for the knuckles
7. Add little horizontal indentions or lines for the knuckles (using another one of my dental tools here)8. Sculpt the finger tips
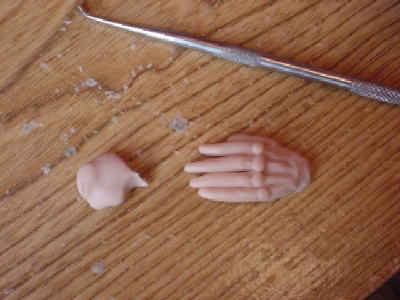
9. Turn over the hand and blend the fingers into the palms of the hand (try to avoid squishing the fingers)
10. Add a little more clay to the palm to thicken it up a bit.
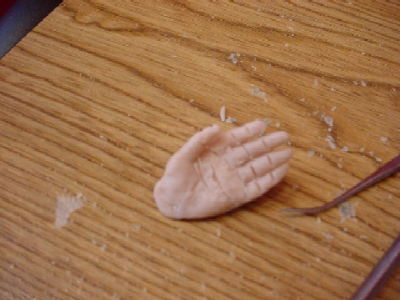
sculpting a hand with clay 11. Add lines to the fingers to match the location on knuckles (on the other side of the hand). I have cut my lines a little deeper then needed since I will bend my fingers.

Sculpting Tribal Scars

Posted by goregt On September - 4 - 2009

There are several different ways that I could approach sculpting the scars on my sculpture and no one way is really better than the other. Since I’m working with polymer clay, Super Sculpey to be specific, the easiest approach in my opinion is to roll out snakes of clay and remove the unwanted pieces. If I was working with wax I may take a different approach such as adding small balls of wax one at a time but I would have to experiment first before confirming.

* Note: I’ve blocked out parts of the sculpture in case anyone is sensitive to nudity. Once I’m finished I’ll add a link to an uncensored picture of the sculpture for anyone that wants to see the complete design. This will be done at the end of the tutorial and for now I’ll just censor the pics as needed. Read the rest of this entry »

Adding veins to the arm

Posted by goregt On June - 24 - 2007

Finish blocking off the arm

In the previous lesson we built a solid foundation for the left arm. We are now at the stage where it is time to start adding all the little details. The steps in this lesson will build off of the rolling snakes and sculpting veins tutorials (I recommend visiting those
lessons first). We will not finish the sculpting on the arm in this lesson but
by the end of the page the left arm should look like it is getting close to
completion.

* This sculpture is created with Super Sculpey.

Read the rest of this entry »

Vaseline

Posted by goregt On May - 31 - 2007

Using Vaseline With Polymer Clay

I’ve already covered the use of Vaseline in a few of my tutorials but though I should also do a little write up on it under the tools section of this site. Vaseline, or Petroleum Jelly, is used to help non-baked clay, which I will refer to as new clay in this article, stick to baked clay. One of the benefits of working with polymer clay is that you can bake the sculpture multiple times during the sculpting process. This key advantage allows you to bake the sculpture in stages verses having to sculpt the entire piece before baking. Read the rest of this entry »

VIDEO

Enter the video embed code here. Remember to change the size to 320 x 270 in the embed code.

TAG CLOUD

Recommended Sites

About Me

Nothing special, just a self-taught sculptor having fun with my art and showing all of you the tips and tricks I use to create my own artwork

Twitter

    Photos

    Activate the Flickrss plugin to see the image thumbnails!